Eat, poop, sleep, eat, poop,
sleep, eat, spit up, scream at Mama, poop 3 times (at least once all over
something that now needs to be laundered), sleep – but not long enough for
anyone else to get a good REM cycle – and repeat. Add to that some lingering soreness
from delivery, soreness from learning to nurse Princess Poopypants (as her
daddy often calls her), & the unexpected onset of the baby blues at the end
of last week, and there are some days it’s hard to remember that this is
exactly what I signed up for. I’m tired is what I’m saying. My husband is
tired.
Wednesday, November 20, 2013
The Never-ending Newborn Cycle
Monday, November 18, 2013
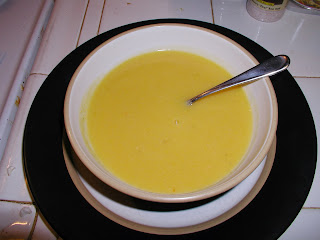
Pumpkin Soup
 This recipe starts with a story: Early in our marriage, my husband and I
were fortunate enough to afford a bi-weekly delivery of a box of
local organic produce. One week in late October, we got a small
pumpkin. And, honestly, we were totally at a loss as to what to do
with it. At the time, I was working full time and my husband was
working part time. And one day I came home to discover that he had
looked through our "Complete Encyclopedia of Vegetables and
Vegetarian Cooking" and found a recipe for pumpkin soup. I'll
admit that I was very skeptical. I am not
an adventurous eater by any stretch of the imagination. However,
given how proud he was of his ingenuity, I grudgingly tasted a small
amount. And it was wonderful! Unfortunately, when we tried to make
more we discovered that grocery stores didn't carry pumpkins past
Halloween! (I think this has changed somewhat in recent years –
definitely you can still find pie pumpkins at Trader Joe's until
Thanksgiving, and local farmers markets usually have some as well.)
Pumpkin soup is now a family staple. My five
year old will eat bowls of it without any prodding – in fact it's
one thing I know she'll eat
even when she's going through a "picky" phase. To minimize
spills and make it easier for her to eat, I ladle hers out before I
add the full amount of milk so that it's a little thicker.
I make
it all winter long, using fresh pumpkin from the farmers market. I
stock up at this time of year when the pumpkins are readily
available. They store well for a few months, and I also freeze some
of the chunks after seeding and peeling so that I have at least one
batch available for late spring. (It may be possible to
use a (large) can of pumpkin, but I've never done so. If you try
that option, add the pumpkin after the potatoes and onions are
finished cooking, before you puree the soup.)
Pumpkin Soup
Ingredients:
1 T olive oil
1 large onion or 2 shallots
1 1/2 lbs pumpkin
1 lb potatoes
1 1/2 c vegetable (or other) stock
1/2 t tarragon
generous pinch nutmeg (optional)
2 1/2 c milk
1-2 t lemon juice
salt and pepper to taste
Equipment needed:
large soup pot with lid
potato peeler
food processor, blender or immersion
blender
conical
strainer with pestle (optional)
Directions:
Assemble ingredients.
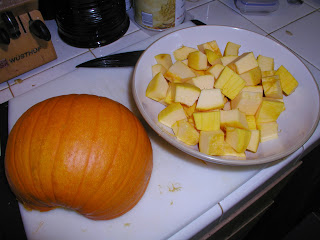
Cut the pumpkin in half and remove the
seeds.
Slice the pumpkin halves in thin wedges
as if it were a cantaloupe (trust me; it's easier to peel once it's
cut in wedges!).
Peel the wedges and cut the pumpkin into large dice
(approximately 1" square, but exact measurements are not
necessary in the least!).
Peel the potatoes and cut them into
large dice. You want your potato pieces to be about the same size as
your pumpkin pieces. Also chop the onion or shallot into large pieces.
Saute the onion (shallot) in the oil
over medium-high heat for a few minutes, until translucent and
fragrant.
Add the pumpkin and potato pieces.
Put the lid on and let everything
"sweat" for a few minutes. (That means let them cook for a
short time in what is essentially steam.) After about five minutes,
give everything a good stir, and add the stock. Add the tarragon and
the nutmeg (if using).
Cook until the pumpkin and the potato
are quite tender – about 20-25 minutes.
Remove from heat and let cool slightly.
Puree everything. You can do this in
your blender or food processor, or use your immersion blender. It's
up to you and the equipment you prefer. My preference is to use my
heavy-duty food processor...
...and then to also strain the puree through
a conical strainer. (It's totally not necessary to strain it, and my
husband thinks I'm a little crazy. What can I say? I like a
super-smooth soup, and I learned to strain it this way in my cooking
classes.)
Once you have everything totally pureed, and ready to go, put it back in the pan to reheat. Add the
milk and the lemon juice and heat over medium heat until warm enough
to serve.
Enjoy with warm crusty bread or crackers.
Happy (and warm) Baking!
Thursday, November 7, 2013
She's Here!
I wasn't able to put up a blog post last week and here's why:
Isn't she precious?! Our sweet Evelyn was born on Tuesday, October 29 (the day after her due date), and I've been a bit preoccupied ever since. :)
Isn't she precious?! Our sweet Evelyn was born on Tuesday, October 29 (the day after her due date), and I've been a bit preoccupied ever since. :)
Monday, November 4, 2013
Peanut Butter
(or other Nut Butter - see note
at end of post)
(Please note: to make peanut butter
you will either need a food processor or a strong blender (or Magic
Bullet.)
You probably know by now that I'm kind
of a DIY junkie when it comes to food. So when the organic peanut
butter that I've been in love with for years started getting outside
my price range, I looked for a way to make my own instead of looking
for a cheaper brand. Turns out, it's not that hard, if you've got
the right equipment. I use my large food processor, but you could
also use a particularly strong blender or a Magic Bullet or
equivalent. Anything strong enough to puree nuts.
When I
started searching, I looked all over for a source for organic raw
peanuts, but as you may remember, there was a big salmonella outbreak
a few years ago that was linked back to peanut butter. So you can't
buy raw peanuts any more. They have to at least be blanched if
they're not roasted. (Yes, it would
be possible to grow my
own, but I don't think I'm quite ready to go that far.) Eventually I
settled for blanched because it's a close to raw as I can get.
I buy my peanuts
through my aunt's health food store in a 30 lb bag. (I divide up the
30 pounds into smaller packages and store them in the freezer so they
don't go rancid before I use them.) The 30 lb bag lasts me for about
5-6 months, but I also use a LOT of peanut butter because I make
granola bars once a week.
The peanut variety
that you use for your butter is entirely up to you. Variety will
affect both taste and texture of your finished product, so you can
experiment with different types if you like, or just go with the most
convenient. I have been fortunate that the variety I buy is
particularly good for making peanut butter, meaning it releases its
oil relatively easily and creates a pretty smooth product.
Because there are
very few ingredients, I'll just write this recipe in narrative form.
Start by filling
your food processor or blender with peanuts. (I've found that I
actually have better results if I start with frozen peanuts, but if
they're not frozen don't worry, it'll still work.) Sprinkle a little
salt over the nuts. Push start.
IT
WILL BE LOUD.
Earsplitting. Run-away-with-your-hands-over-your-ears noisy. Give
it a minute and the noise will subside as the peanut pieces get
smaller.
Eventually, you'll reach the point where the food processor doesn't
seem to be making any progress. You'll have a big blob of chopped up
nuts that don't want to go any further. At this point, I let
everything rest for about 30 minutes. (You don't have to...you could
just push on and eventually you'll get the mass to puree, but I find
that if I let it rest, it's a whole lot easier.)
Turn it back on. Gradually the mass will begin to liquidize as the
nuts release their oil.
If you like smooth peanut butter, keep going
for several minutes until everything smooths out.
If you like chunky
peanut butter, you can stop sooner, but your peanut butter may be
more difficult to spread because the oil won't have been fully
released. You can add a little peanut oil, if you like, or you can
process everything to smoothness and then add some chopped nuts (the
latter is the way “they” actually make chunky peanut butter).
If
you prefer your peanut butter sweet (I really really don't!), you can
add a little honey – just start with a little bit, and add more to
taste. Taste for saltiness as well, and add more if you want to.
Transfer your peanut butter to a container and enjoy!
Note:
Since I first
planned to write this post I've been diagnosed with a mild food
allergy to peanut butter. Fortunately, the allergy level I have is
by no means life threatening, and might not really be affecting me
physically at all, but it still means I've been experimenting with
alternatives. If you have a peanut allergy in your family, you can
follow the same method above to make pretty much any nut butter –
although so far I've only tried almond. I had to add just a little
oil (I used coconut oil, and the result was amazing), and
the resulting almond butter is somewhat gritty due to the almond
skins, but it's definitely a good peanut butter alternative once you
get used to the different texture. I experimented with blanching
some almonds to use instead, hoping the texture would be more like
peanut butter, but I ended up with almond paste instead of almond
butter (too much moisture!). Experiment with your own and see what
you come up with!
Subscribe to:
Posts (Atom)


